Step 1 : Create a variable that is capable of holding a 2d texture image.
Step 2 : Load the actual image that we are going to draw, into the project.
Step 3 : Give the texture variable that we created the value of the actual image we loaded into the project.
Step 4 : Draw the image onto the screen each frame.
I will go through these steps, trying to make it as easy as possible.
Step 1-Create a variable that is capable of holding a 2d texture image
First off we need to create a variable that can hold all the information a texture image has. Thankfully, Microsoft has made XNA, which has lots of different classes that have different uses. Out of these classes is one that is perfect for our use. This class is called the Texture2D class. So now right above the constructor(public Game1()) type in this code :
private Texture2D myTexture;
Simple enough. First off we declare private.
private is a keyword and should appear in blue. All that this word does is set an access modifier. In other words, by using this word in front of a variable declaration, we have said that only code inside the Game1 class can access it.
After the Texture2D statement, we have the myTexture.
This should not appear in any special color, because this is just a name. This name refers to one Texture2D class. Now whenever we want to access something that a Texture2D class has, we just use myTexture. I have named our Texture2D class, myTexture, but it doesn’t really matter what you name it. Be careful though, names of variables are case sensitive.

Figure 1-1 The Variable Declaration
Last but not least, we end our variable name with a semicolon. Semicolons are used to end statements. There is a pretty basic rule about semi colons. Whenever a statement has two following curly braces after it, then you do not put a semicolon. Otherwise, pretty much always end statements with a semicolon.
Step 2-Load the actual image that we are going to draw, into the project
After we have created our variable and named it myTexture. We can draw it right? Wrong. All the values inside myTexture(our Texture2D class) are set to default and null(nothing) values. We can’t draw the image because some of the data is nothing. First we need to set our myTexture variable to an image, and then we can draw it. Now the problem is how to do just that. How do we set a Texture2D variable to a real image? Theoretically, we could create a file stream and then load a texture image that way, but it would be way harder. Microsoft has again created an easier way to load content(images, sound, models, etc). This is called the Content Pipeline. All we have to do is load our image into our project, and then do a simple command to access this image.
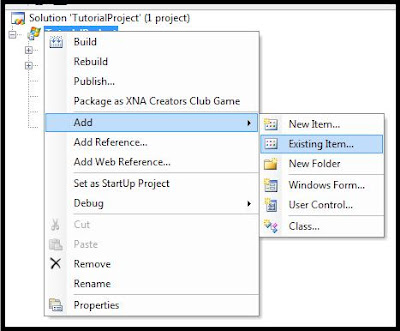
First, lets load our image into our project. Go to the Solution Explorer(View-->Solution Explorer). Now you should see the name of your project with a little computer flag by it(that is the symbol for a Windows Game). Right click on the name of your project and go to Add--> Existing Item.

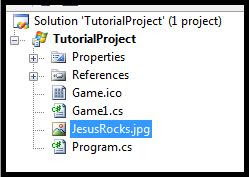
Now you should see your some files of your game. Browse to where the image you want to add is. You should see nothing. This is because you are not looking at files related to the Content Pipeline. Go to the bottom where the Files of Type drop down box is. Select Content Pipeline files. Now you should see your image. Select that image and click Add(bottom-right). In the Solution Explorer under the files related to your project, you should see your image file. Now you have added the image into your project. The next step is to do something with it.

Step 3 : Give the texture variable that we created the value of the actual image we loaded into the project
We are half way done now. We still can’t draw anything yet because our values in the myTexture variable are still set to default and null values. Even though we loaded the image into our project. The myTexture variable doesn’t just magically get assigned the value of the texture. In order to assign the myTexture variable to the image we loaded into our project, we need to type this line of code inside the LoadGraphicsContent method:

Figure 1-4 The LoadGraphicsContent Method
After you have located the method, you should see an if statement. Inside the if statement should be a green line of code(It is green because it is a comment. Comments are marked with two preceding backslashes and are just there to help the coder). Delete the comment and type in this line of code in it’s place:
myTexture = content.Load<Texture2D>(“JesusRocks“);
This is the actual code that loads our texture variable with a real image. Pretty sweet. One problem though. It may be kind of confusing. Hopefully not for long.
First we start with myTexture =.
This is getting our myTexture variable ready to be assigned(or re-assigned) a value. The equals operator(sign) is used like it shows in pretty much all cases. It is used to assign or re-assign values to variables.
Next we have the content.Load
This looks like a complicated statement but is actually quite simple. First we access the content variable. If you look to where you placed your Texture2D variable declaration, above it somewhere, you will see two more variable declarations. These are created there by default and are used for drawing and loading graphics. The second one down is the ContentManager content variable declaration and is just creating a ContentManager class and naming it content.
This variable is initialized(set to a value) in the constructor and is done so by default.
Now back where we are loading our myTexture variable we can use this content variable to help with loading. It so happens that the ContentManager class has a method(a group of code that we can call) that is called Load. We access this method by using content.Load. We use the dot to access all the available methods that the content variable has stored within.
After the content.Load we have
After the first set of parameter symbols, we have the () symbols. These are where we pass in variable parameters. We pass in a string which refers to the name of our image that we loaded. As you may notice, we have excluded the file extension because it is not needed and can not be used when you pass in the string. Also, going back to parameter types, since I need a string as a parameter in between the () symbols, I pass in an already initialized string. If I had passed in the class name, String, it would not work. It is all pretty easy to tell the difference because it depends on whether you are using the <> symbols or the () symbols.
The texture name that I loaded into my project is called JesusRocks, so I passed that in between the () symbols. I also put quotation marks before and after the, JesusRocks, to symbolize that this is a string and not a variable name.
Note: You may be wondering how I had known that I was to pass in a string into the () symbols. If you just type(or re-type) the first parenthesis, you will see that a tan box comes up showing the name of the method and then all parameters needed. In this case, the tan box shows that I need a string.

Finally, I end the statement with a semicolon. Because there are not two curly braces following the end of this statement(line of code), I end with a semicolon.
Phew, that was a very long step and I really hope that didn’t confuse you, but eventually, you will get the hang of it. Now time to draw.

Figure 1-6 The Code Inside the LoadGraphicsContent Method
Step 4-Draw the image onto the screen each frame
Now comes the fun part. Actually seeing what you are doing. If you run the code right now(F5) then you will see only a blue screen. This is because we haven’t called any method to draw our texture. First before we do any drawing, we need a SpriteBatch. A SpriteBatch is a class Microsoft has let us use that allows us to draw images to the screen. In order to use this class, we must create a variable for it. Just like we did for the Texture2D variable, create a SpriteBatch variable:
private SpriteBatch mySpriteBatch; 
Figure 1-7 Our SpriteBatch Variable Declaration
After we have named our SpriteBatch variable, we must initialize it. In the Initialize method, type this code inside of the method.
mySpriteBatch = new SpriteBatch(graphics.GraphicsDevice);All this code is doing is assigning the value of our SpriteBatch variable that we created, to a new SpriteBatch class. We use the new keyword to specialize that we want to create a new ‘something‘. Then we place the name of the class we want to create(we put a SpriteBatch because our mySpriteBatch variable is a SpriteBatch).
After the name of the class you see what looks like a parameter. This actually is a parameter. We are calling the constructor of the SpriteBatch class. A constructor is like a method that helps create a class. Every class has one and it looks like a method. The constructor of the SpriteBatch class takes the parameter of a GraphicsDevice class. A GraphicsDevice is a class that helps with drawing. At the top of our code right above the ContentManager variable declaration, you see a GraphicsDeviceManager variable declaration. This variable is named graphics. Again, like the ContentManager variable, graphics is initialized by default. Now since graphics is a GraphicsDeviceManager, in order to get the GraphicsDevice that is stored inside of the GraphicsDeviceManager class, we need to use the command, graphics.GraphicsDevice which gets the GraphicsDevice related to the graphics variable.

Figure 1-8 Initializing our SpriteBatch
Note: Not all classes have a GraphicsDevice related to them. The GraphicsDeviceManager class does have one though.
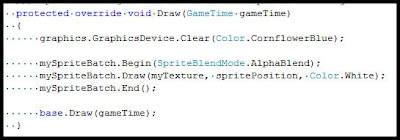
Now that we have our SpriteBatch variable created, we have a sprint to the finish. In the Draw method, find this code:
graphics.GraphicsDevice.Clear(Color.CornflowerBlue);
This code just accesses the GraphicsDevice of the graphics variable, and calls a method of the GraphicsDevice class that clears the screen color to a specified color. By default, this code is there and a color is passed in. This color is CornflowerBlue. You may change this color if you want. Anyway, after this statement, place this code:
mySpriteBatch.Begin(SpriteBlendMode.AlphaBlend);
mySpriteBatch.Draw(myTexture, new Vector2(0, 0), Color.White);
mySpriteBatch.End();
This code actually draws your image onto the screen. First off, we call:
mySpriteBatch.Begin(SpriteBlendMode.AlphaBlend);
This code calls the Begin method of the SpriteBatch class, which is required to get the mySpriteBatch variable ready for drawing. We pass in a certain blend mode as a parameter. A blend mode is just a way that you want to draw the sprites. SpriteBlendMode.AlphaBlend is just saying that you want to draw your sprites using transparency(alpha is the transparency value of an image).
Then we have the meat of the code:
mySpriteBatch.Draw(myTexture, new Vector2(0, 0), Color.White);
This code calls the Draw method of the SpriteBatch class. This method is the first method we have used that takes more than one parameter.
First off, the method needs a Texture2D variable to actually draw. We pass in our myTexture variable. Then, after a comma, which is needed to separate one parameter from the next, the method needs a position to draw the sprite at. The method is asking for a Vector2 which is a class that holds the x and y coordinates of anything. Instead of passing in an already created variable, we can also just create a variable right there and then, inside of the method call. We do this by just saying, new Vector2(0, 0). As you may recognize, we are again calling the constructor of a class. This time we are calling the constructor of the Vector2 class. This constructor takes two parameters, an x and a y coordinate. We specify, 0, 0 to say that we want to draw the sprite at the top-left corner of the screen. Lastly, we pass in a color to taint our sprite with. This can be used to show if a certain sprite is selected. In our case we don’t want our sprite to be tainted with any color, so we specify Color.White.

Figure 1-9 The Code to Draw Our Sprite
Lastly, we end with:
mySpriteBatch.End();
This calls the End method of the SpriteBatch class. This method takes no parameters, but we still have to place the two parentheses. The End method actually draws the sprites on the screen.
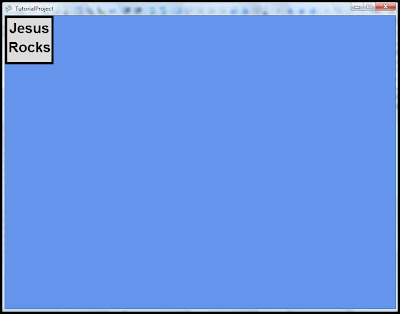
Now if you press F5(or click the green arrow on the top of the page), you can see your sprite drawn on the screen:

Figure 2.0 The Final Result-Our Sprite Drawn on The Screen
Even though you didn’t specify anything about frames, since you placed your drawing code inside the Draw method, the sprite is drawn every frame. Now maybe you are wondering why the top-left point of the sprite is drawn at position 0, 0, instead of maybe the center of the sprite. This is because the origin(main position) of your sprite is set by default at the top-left corner of your image. You can change the origin of where your sprite is drawn at, but we will not go through that today.
Now, after a lot of work, you have drawn a sprite on the screen.
If you have any questions or requests, post a comment.
If you need something, pray.
1 comment:
Very nice tutorial; probably worked just fine with XNA version 1.0 but doesn't compile in the current version of C#/XNA. Any chance of an update? Thank you so much...
Post a Comment