In this tutorial, I want to introduce mouse input. What this tutorial will teach is how to move a sprite to a certain position based on the mouse position.
For this tutorial., we will use a new image. Start off the project by adding an image through the Solution Explorer(remember Add--> Existing Item).
Now create a Texture2D variable and initialize it with your image that you loaded into your project(remember content.Load etc...) I will name my variable myTexture2;
Create a Vector2 variable named spritePosition2 and initialize it with a value of 400, 300. This is so that it will appear in a different position then the first texture we have, which is at position 0, 0.
Finally, call mySpriteBatch.Draw under the call for our first texture and draw myTexture2(really you can put the mySpriteBatch.Draw call anywhere as long as it is in between the mySpriteBatch.Begin and mySpriteBatch.End calls). Pass in spritePosition2 for the position to draw the sprite at.
 Figure 1-1 The Call to Draw the Second Texture
Now run the project. You should get a result looking something like this:
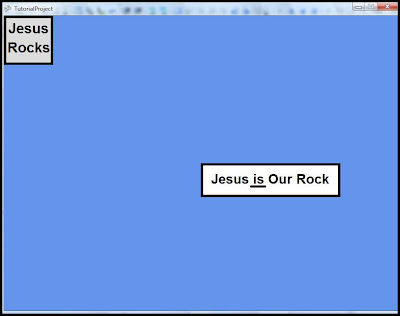 Figure 1-2 The Newly Drawn Texture
Now we can move on to what the tutorial is supposed to do. Follow these steps.
Step 1: Create a variable to keep track of mouse input.
Step 2: Check if the mouse left button is pressed.
Step 3: Move the sprite to the position of the mouse.
Step 1: Create a variable to keep track of mouse input
Just like the KeyboardState variable we used to check for keyboard input, Microsoft gives us a MouseState variable to keep track of mouse input. Create a MouseState variable and name it myMouse. Now initialize the variable in the Update method underneath where we have all our other code except the base.Update call. We initialize(or more often re-set the value of) the variable by using the command myMouse = Mouse.GetState(); I wanted to initialize the variable underneath all our other code because we will check for mouse input underneath all the other code and I wanted to keep the code for moving the second sprite all kind of in one general area.
Step 2: Check if the mouse left button is pressed
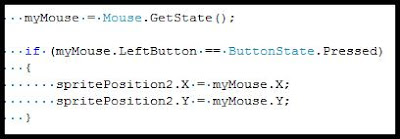
In order to check if the mouse left button is pressed, place this statement underneath the myMouse = Mouse.GetState() call;
if(myMouse.LeftButton == ButtonState.Pressed)
{
}
This code checks if the left button of the mouse is pressed. We check for the left button of the mouse using the command mouseStateVariable.LeftButton. Then we check if it is pressed by using the command == ButtonState.Pressed. The == operator is not the same as the = operator. The = operator assigns values to variables while the == operator checks the values of variables. The == operator can only be used in if statements.
Now we have checked if the left button of the mouse is pressed.
Note: We are checking if the left button of the mouse is currently pressed, not clicked which means pressed and then released. We will discuss how to do check if the left button of the mouse is clicked in a following tutorial.
 Step 3: Move the sprite to the position of the mouse
Now comes the part where we move our sprite.
In order to move our sprite to the position of the mouse, we need to access the X and Y-positions of the mouse, and then change the position of the sprite to those positions. Place this code inside the if statement that checks if the left button of the mouse is pressed.
spritePosition2.X = myMouse.X;
spritePosition2.Y = myMouse.Y;
This code is very simple and straightforward. All we are doing is resetting the X and Y-Positions of the sprite to the X and Y-Positions of the mouse, which we get by using the commands mouseStateVariable.X and mouseStateVariable.Y.
 Figure 1-3 The Code That Checks for Mouse Input
Now there is just one problem left. By default, the mouse is not visible when it is on top of the screen. In order to fix this, place this code inside the Initialize method above the base.Initialize call.
IsMouseVisible = true;
This code just sets the mouse to be visible when it is on top of the screen.
Now you have checked for mouse input, which is not that different from keyboard input. If you run the project now, you can move the second sprite to the position of the mouse whenever you press the left button of the mouse. Notice the sprite will move even when the mouse button has not been released yet. This is because we are not checking if the mouse has been clicked. We will solve this problem in a following tutorial.
Finally, you may notice that if you click outside the screen, the sprite goes out of the screen also. We do not want this to happen. There are two ways we could come about stopping this. Either we could move the sprite to the edge of the screen when the mouse is clicked outside of the screen, or we could ignore mouse input when the mouse is clicked outside of the screen. I am going to choose the second option because it is easier.
In order to ignore mouse input when the mouse is around the screen, after we have checked if the mouse is clicked, we need to check that the mouse is in the screen before we move the sprite. To do this, we can use an easy helper Microsoft has given us called Intellisense. Highlight the code that moves the sprite to the mouse position and right click.
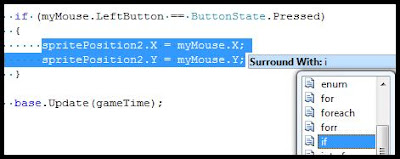 Figure 1-4 Intellisense Helping us Create an If Statement
You should see a box come up. Click on Surround with and then find the if(or type in i). Now hit enter. You should see that your code that moves the sprite is now surrounded with another if statement. Fill in the if statement as this if statement looks:
if(mouse.X st screenRectangle.Right && mouse.X > screenRectangle.Left && mouse.Y > screenRectangle.Bottom && mouse.Y st screenRectangle.Top)
{
spritePosition2.X = myMouse.X;
spritePosition2.Y = myMouse.Y;
}
This checks if the mouse is inside the screen rectangle by checking that the mouse positions are not outside of the screen rectangle edges.
There is actually an easier way to do this though. We can just check if the mouse is inside of the rectangle by creating a rectangle around the mouse and then checking if it is inside of the screen rectangle by using a helper method that the rectangle class has called, Intersects.
Create a rectangle around the mouse by putting this code above the second if statement:
Rectangle mouseRectangle = new Rectangle(myMouse.X, myMouse.Y, 1, 1);
This just creates a 1 by 1 pixel rectangle around the mouse. Now replace the code inside the second if statement with this code:
if(mouseRectangle.Intersects(screenRectangle))
{
spritePosition2.X = myMouse.X;
spritePosition2.Y = myMouse.Y;
}
We are now checking of the mouse rectangle is intersecting the screen rectangle. If the mouse is outside of the screen, this if statement will not return true and the code inside will not be executed.
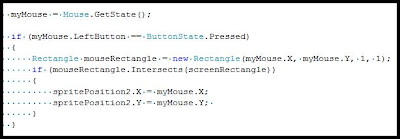 Figure 1-5 The New Code to Move the Sprite
Now you can move the sprite to where the mouse is clicked, but only if the mouse is inside of the screen.
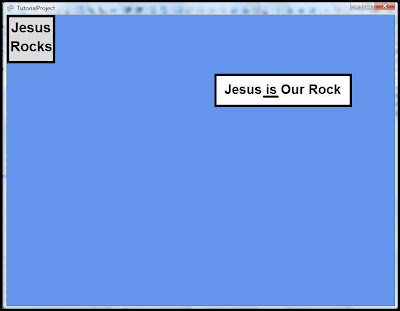 Figure 1-6 Final Ouput of the Tutorial
If you have any requests or questions, please post a comment.
Thanks for reading this tutorial.
If something bad happens, do you really think that God does not have it under control?
No comments:
Post a Comment